

I’m putting this information together because it’s nice to have all the information you need is a single place without having to resort to a search engine.
These instructions will explain the basic tools, items and modifications necessary to install a VS1400 drive assembly on a VL800/C50 using a VL800/C50 driveshaft and spacer.
What’s the purpose of this modification?
To achieve a higher/sustainable top speed
To reduce engine vibration from high RPMs while traveling 70+ MPH
To increase fuel efficiency (arguably)
Tools Needed:
Metric box wrench set (up to 22mm)
Metric socket set
*Tork wrench
Metric allen wrench set
Snap ring wrench (straight/inner)
Needle nose pliers
*Rubber or plastic mallet
Several round rat tail files (or a 9/16” drill bit)
*Corded drill
Small parts brush
Bike lift or equivalent
Items Needed:
VS1400 final drive assembly (SKU: 27300-38845)
VS1400 spring for driveshaft (SKU: 09440-30008 )
C50/VL800 drive shaft (SKU: 27151-41F00)
C50 or VS1400 axel spacer (SKU: 64772-34201 or SKU: 09180-17088 )
VS1400 oil seal (SKU: 09283-30026)
VS1400 circlip (SKU: 09381-40003)
*Cotter pin (SKU: 04111-40308 )
Honda Molly 60 paste (or equivalent)
75W-90 gear oil
* Indicates optional
While the VS1400 drive assembly uses the same diameter driveshaft as the VL800/C50, the C50 driveshaft and spacer will need modifications to work properly with the VS1400 drive assembly. Otherwise, the driveshaft may put undue stress on the bearings.
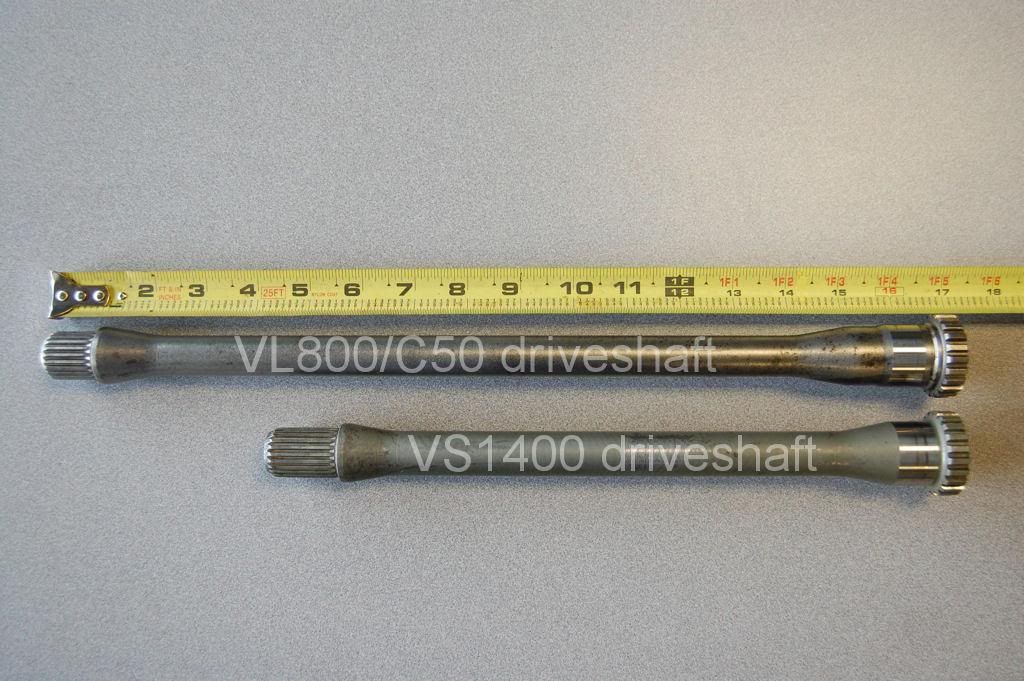
As you can see, the VL800/C50 driveshaft is much larger than the VS1400 driveshaft:
![Image]()
This is a VL800/C50 driveshaft after it has been machined; modifications from the original driveshaft are noted in red:
![Image]()
(Admin Note - In the above picture the shoulder only gets pushed back 3/16" of an inch, not 3/8", tool used for undercut was 3/8" wide)
The shoulder, measured from the drive end should be 15-3/4" after the shoulder is pushed back as in the picture below.
![Image]()
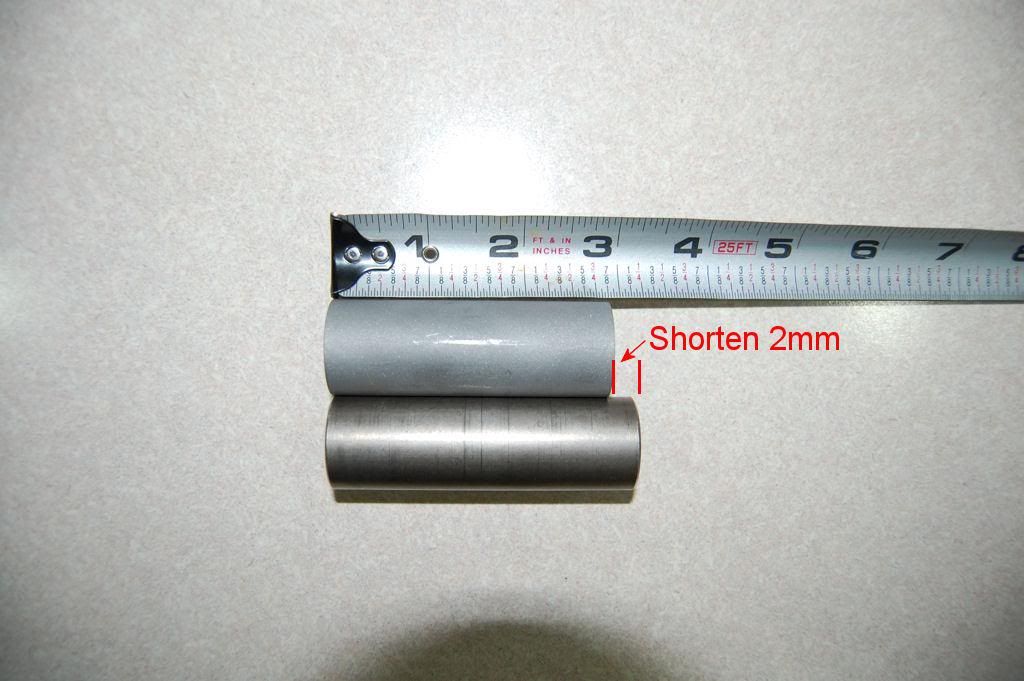
The original VL800/C50 spacer can be shortened by 2mm, or it can replace it with another spacer that’s 2 7/8” in length. Make sure the replacement spacer is hardened steel. Here’s a stock VS1400 spacer next to a replacement spacer:
![Image]()
A replacement oil seal and circlip should be purchased from a Suzuki dealer. While the original circlip may be in good condition, it’s better to have a spare on hand incase the original breaks during assembly.
![Image]()
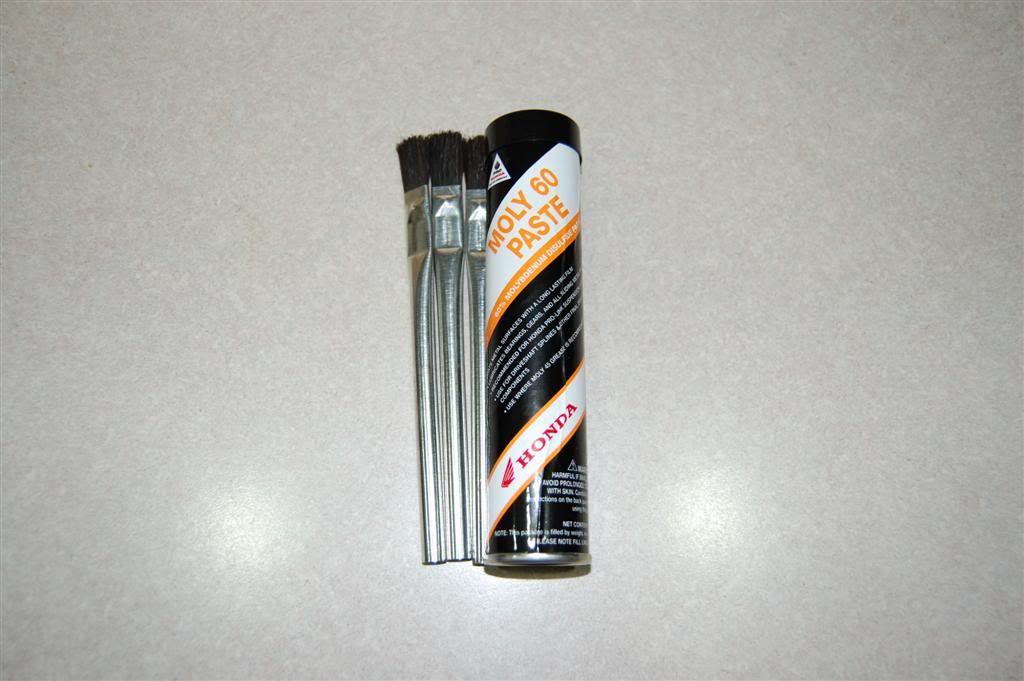
Pick up some Honda Molly 60 grease (or equivalent) from a local Honda dealer. Make sure the grease contains at least 44% molly (as recommended by Suzuki). Standard automotive molly grease should not be used as it does not offer adequate protection. The molly grease will be applied using a small parts brush to the splines on the driveshaft and drive assembly. I also applied it to the axel shaft and spacers.
![Image]()
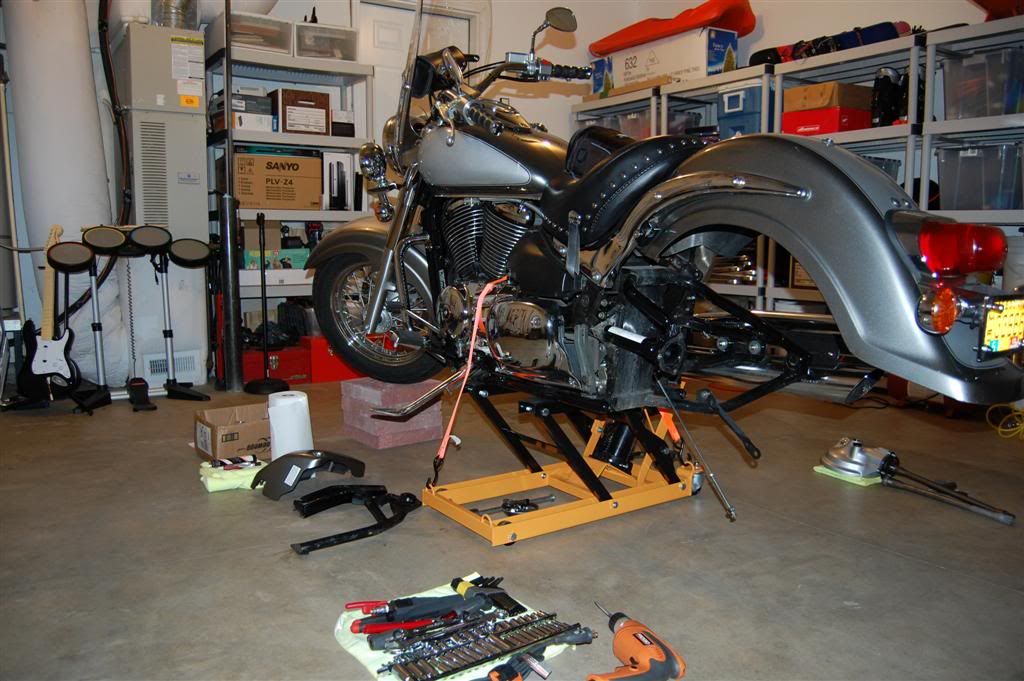
Find a well lit/flat surface to work on; this modification can take several hours to complete so plan for enough time (it took me aproximately 2 hours). Secure the bike to the stand and proceed to remove the drive assembly using the Rusks’ “Checking Driveshaft Lubrication” guide found on the VR site.
It’s a good idea to put something underneath the front tire to help support the bike. When you remove the drive assembly and wheel, the bike becomes front heavy and may try tipping over.
![Image]()
Using a file (or 9/16” drill bit if preferred), enlarge the mounting holes for the VS1400 drive assembly. Take your time and make sure everything is lined up properly by test fitting the drive assembly multiple times. Forcing the drive assembly onto the frame will damage the threads on drive assembly. I used a rat tail file with a high speed drill to elongate the holes.
![Image]()
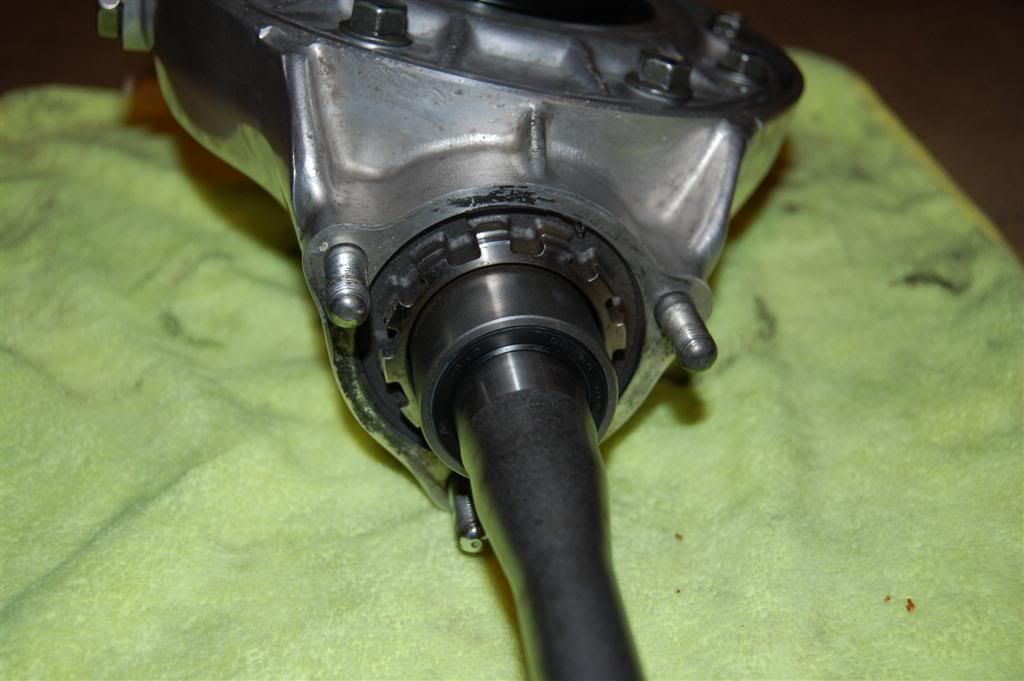
Attach the modified driveshaft to the VS1400 drive assembly using the circlip. Slide the seal onto the driveshaft and push it down until it is flush with the drive assembly. The seal keeps the molly grease in and contaminants out.
![Image]()
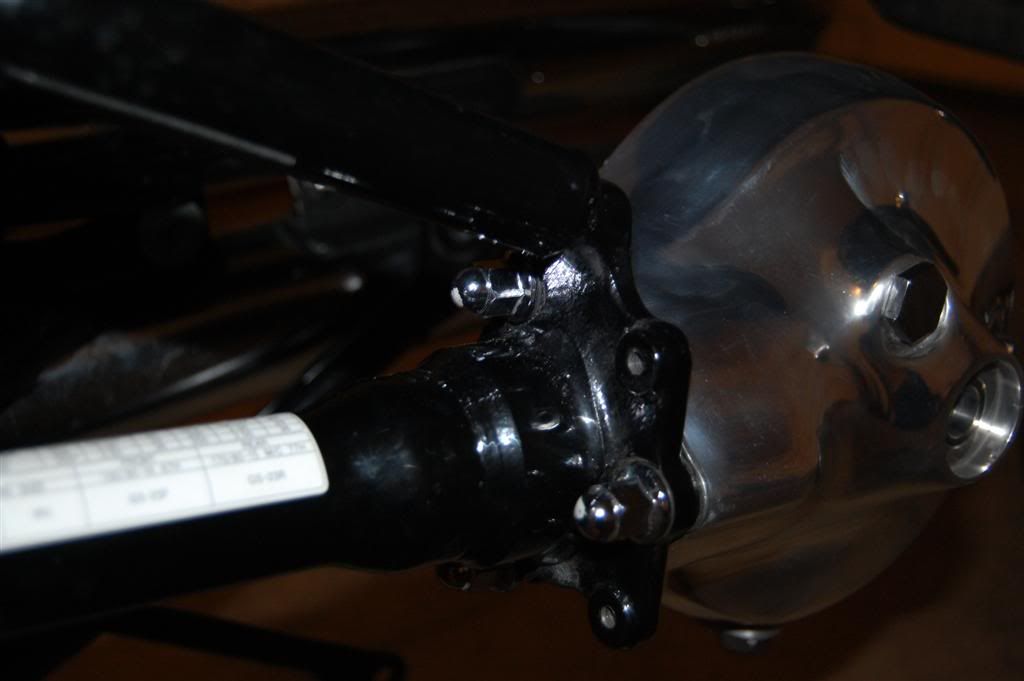
Slide the driveshaft into the u-joint and secure the drive assembly to the frame. If the shaft will not go back in all the way, try rotating it. If that doesn’t work, pull the drive assembly back out and try using a long broom handle to realign the u-joint that’s inside the bike (you may need to use a flashlight to see if the u-joint is straight). It took me a couple tries to get it to align properly.
![Image]()
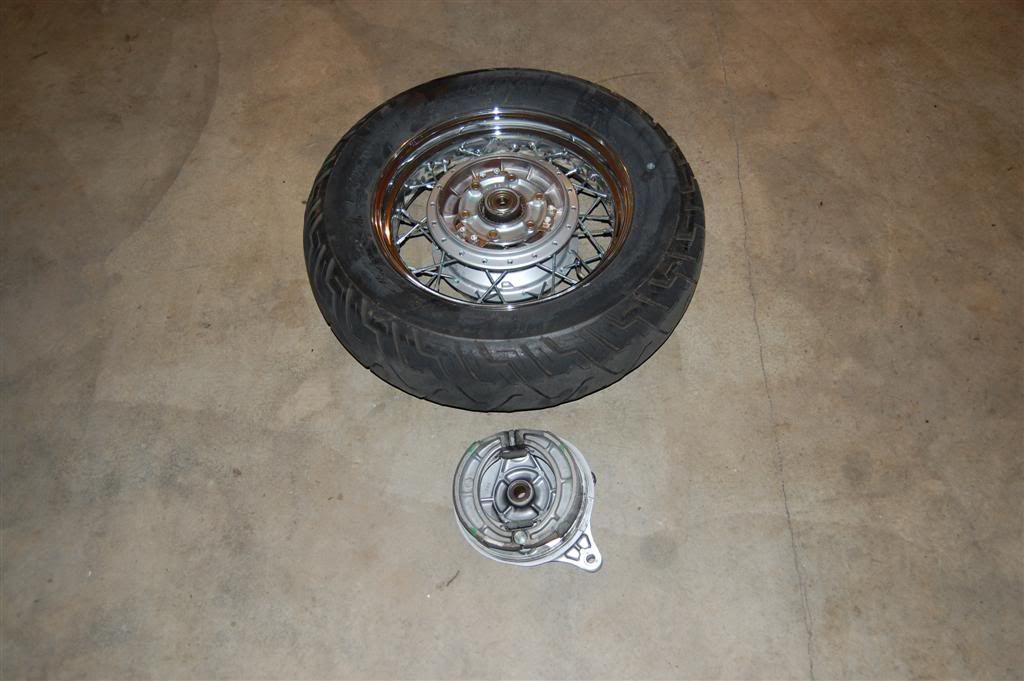
Now is a good time to check your rear brakes for wear and/or clean them.
![Image]()
Insert the modified (or new) spacer into the VS1400 drive assembly. Assemble the wheel and brakes in the reverse order of the Rusks’ guide mentioned above. If possible, use a tork wrench and tighten everything up to specification (foot pounds can be found in a service manual). I didn’t have a tork wrench on hand, so I used the ole’ GNT (good n’ tight) scale. Once everything is back together, put the bike in neutral and gently spin the rear wheel. It will spin smoothly if everything is aligned properly. Fill the drive assembly with gear oil and you are done!
![Image]()
Take it easy on the drive for a little while. If something isn’t aligned properly, it will likely present itself within the first ~100 miles. Just like new brakes, gears take a little time to “mesh” together. Also, park the bike in an area where it can be monitored for minor oil leaks.
Edit: 2/19/23 - Whiskey - Changed 1/2" bit to 9/16". If it's wrong, Captain told me to do it. 🤷♂️
These instructions will explain the basic tools, items and modifications necessary to install a VS1400 drive assembly on a VL800/C50 using a VL800/C50 driveshaft and spacer.
What’s the purpose of this modification?
To achieve a higher/sustainable top speed
To reduce engine vibration from high RPMs while traveling 70+ MPH
To increase fuel efficiency (arguably)
Tools Needed:
Metric box wrench set (up to 22mm)
Metric socket set
*Tork wrench
Metric allen wrench set
Snap ring wrench (straight/inner)
Needle nose pliers
*Rubber or plastic mallet
Several round rat tail files (or a 9/16” drill bit)
*Corded drill
Small parts brush
Bike lift or equivalent
Items Needed:
VS1400 final drive assembly (SKU: 27300-38845)
VS1400 spring for driveshaft (SKU: 09440-30008 )
C50/VL800 drive shaft (SKU: 27151-41F00)
C50 or VS1400 axel spacer (SKU: 64772-34201 or SKU: 09180-17088 )
VS1400 oil seal (SKU: 09283-30026)
VS1400 circlip (SKU: 09381-40003)
*Cotter pin (SKU: 04111-40308 )
Honda Molly 60 paste (or equivalent)
75W-90 gear oil
* Indicates optional
While the VS1400 drive assembly uses the same diameter driveshaft as the VL800/C50, the C50 driveshaft and spacer will need modifications to work properly with the VS1400 drive assembly. Otherwise, the driveshaft may put undue stress on the bearings.
As you can see, the VL800/C50 driveshaft is much larger than the VS1400 driveshaft:
This is a VL800/C50 driveshaft after it has been machined; modifications from the original driveshaft are noted in red:

(Admin Note - In the above picture the shoulder only gets pushed back 3/16" of an inch, not 3/8", tool used for undercut was 3/8" wide)
The shoulder, measured from the drive end should be 15-3/4" after the shoulder is pushed back as in the picture below.

The original VL800/C50 spacer can be shortened by 2mm, or it can replace it with another spacer that’s 2 7/8” in length. Make sure the replacement spacer is hardened steel. Here’s a stock VS1400 spacer next to a replacement spacer:
A replacement oil seal and circlip should be purchased from a Suzuki dealer. While the original circlip may be in good condition, it’s better to have a spare on hand incase the original breaks during assembly.

Pick up some Honda Molly 60 grease (or equivalent) from a local Honda dealer. Make sure the grease contains at least 44% molly (as recommended by Suzuki). Standard automotive molly grease should not be used as it does not offer adequate protection. The molly grease will be applied using a small parts brush to the splines on the driveshaft and drive assembly. I also applied it to the axel shaft and spacers.
Find a well lit/flat surface to work on; this modification can take several hours to complete so plan for enough time (it took me aproximately 2 hours). Secure the bike to the stand and proceed to remove the drive assembly using the Rusks’ “Checking Driveshaft Lubrication” guide found on the VR site.
It’s a good idea to put something underneath the front tire to help support the bike. When you remove the drive assembly and wheel, the bike becomes front heavy and may try tipping over.
Using a file (or 9/16” drill bit if preferred), enlarge the mounting holes for the VS1400 drive assembly. Take your time and make sure everything is lined up properly by test fitting the drive assembly multiple times. Forcing the drive assembly onto the frame will damage the threads on drive assembly. I used a rat tail file with a high speed drill to elongate the holes.

Attach the modified driveshaft to the VS1400 drive assembly using the circlip. Slide the seal onto the driveshaft and push it down until it is flush with the drive assembly. The seal keeps the molly grease in and contaminants out.
Slide the driveshaft into the u-joint and secure the drive assembly to the frame. If the shaft will not go back in all the way, try rotating it. If that doesn’t work, pull the drive assembly back out and try using a long broom handle to realign the u-joint that’s inside the bike (you may need to use a flashlight to see if the u-joint is straight). It took me a couple tries to get it to align properly.
Now is a good time to check your rear brakes for wear and/or clean them.
Insert the modified (or new) spacer into the VS1400 drive assembly. Assemble the wheel and brakes in the reverse order of the Rusks’ guide mentioned above. If possible, use a tork wrench and tighten everything up to specification (foot pounds can be found in a service manual). I didn’t have a tork wrench on hand, so I used the ole’ GNT (good n’ tight) scale. Once everything is back together, put the bike in neutral and gently spin the rear wheel. It will spin smoothly if everything is aligned properly. Fill the drive assembly with gear oil and you are done!

Take it easy on the drive for a little while. If something isn’t aligned properly, it will likely present itself within the first ~100 miles. Just like new brakes, gears take a little time to “mesh” together. Also, park the bike in an area where it can be monitored for minor oil leaks.
Edit: 2/19/23 - Whiskey - Changed 1/2" bit to 9/16". If it's wrong, Captain told me to do it. 🤷♂️


